your heart is just a beatbox for the song of your life
If it sounds good it is good
Welcome to Ghost Xoos’ Music Production Resources
All things music production related. Synths, hardware, software, DAWs, mixing, mix downs, tape, saturation, mastering I’ll cover off topics on all areas and stages of music production.
Good enough resources for sample packs. If the publisher of a sample pack states that the samples on the pack are ‘royalty-free’, it means that you do not have to pay any royalties to them or the people involved in creating the sample.
When people create samples or loops that are specifically designed for other people to use, they make them royalty-free so that you do not have to pay any royalties to the creator or enter into an additional written agreement with them. Depending on any restrictions in the terms of use of the sample library, they can also be used however the person downloading them wants.
This guide lists samples whose creators have given them away for free or for a small fee. Why would someone give samples away for free? Well, some producers just enjoy making them, or want to be generous with material they have produced for their own use, or just want to give back to the community of sound creators. Whatever their reason, it’s good news for you.
These days, most DAWs come with a host of built-in free VST plugins. These are generally designed to give you a good set of starting tools to make the most of your DAW. However, most DAW designers are very good at building DAWs and not as good at building VSTs. Whilst there are always a few stand out tools that every DAW user couldn’t live without, it’s quite common to find a large array of third-party plugins in professional studios. I know myself that over 95% of the plugins I use on a regular basis are third-party.
Now I’m sure you’re thinking that it’s all good and well having third-party VSTs if you’ve got the money. This is where I step in. Today we’re going to take a look at 13 free VST plugins for windows that give the high-end gear a serious run for their money.
Free VST Reverbs
First off, let’s take a look at reverbs. This is probably one of the most abundant freeware plugin types on the market. However, there are some real duds out there. I’ve got two great bits of kit here that will really help bring some depth to your mixes.
epicVerb by Variety of Sound
The first of these is epicVerb. Designed for maximum flexibility, this algorithmic reverb does it all. From small, ambient spaces to luscious halls, you’ve got full control. With a built-in EQ and modulation controls, there aren’t many spaces you can’t recreate with this thing.
RoomMachine 844 by Silverspike
Another interesting reverb plugin is RoomMachine 844. This plugin appears to be modeled on a convolution premise in that it is designed to simulate speakers and microphones in a real space. However, as they are digital, we can assume it is still using algorithms to do the calculations and not impulse responses. However, it still has a unique premise. You are able to use the positions section to place to virtual loudspeakers and then dictate their stereo width and distance from the microphones. This lets you simulate real spaces that suit what you are trying to achieve. The controls are simple and you certainly won’t get as many unique tones out of this one but it’s still a fantastic free VST.
Time for Some EQ
There are a variety of different EQs types out there and every DAW comes with at least. This is typically a standard parametric EQ with fairly limited capabilities. As such, I can imagine that you might be wanting of a few more choices when using EQ.
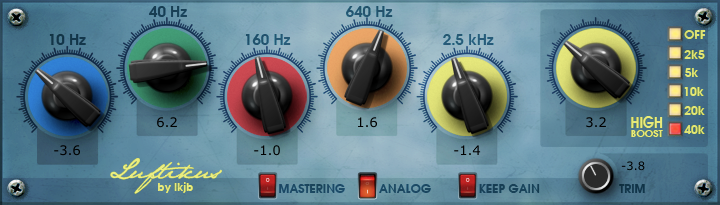
Luftikus by IJKB
Some of my favourite EQs to work on are also some of the simplest ones you can get. I’ve always loved mixing with hardware EQ and really using my ears to sculpt the tone of my signals. As such, fixed band EQs whilst limiting, give me fantastic results. Unlike parametric EQs, you have to work with the fixed bands and as such, be far more careful with your choices. Using your ears, you make minor adjustments and keep things musical, not clinical.
Now, unfortunately, these types of EQs usually come at a cost. They are typically emulations of famous hardware and as such, yield similar prices. I’m talking about things like APIs and Pultecs. That was until I came across Luftikus.
This multi-band fixed EQ comes with four half octave bells, one half octave high shelf and another high shelf with adjustable fixed frequency points. It’s generally very gentle and you will have to really crank the knobs to get it to do much. However, this is kind of what makes it great. It’s one of those tools that’s handy when you’re trying to be subtle, especially with subtractive EQ. Bus EQing and master channel EQing come to mind here.
It also has three switches built into the bottom. One enables ‘mastering’ mode. This changes the EQ knobs from being adjustable by 0.1dB to being adjustable by 1dB. This means that each step on the knob will have a significantly more noticeable effect as it jumps. Very handy for final adjustments and mastering. We’ve also got an ‘analogue’ switch to emulate an analogue sound. Finally, there is a ‘keep gain’ switch designed to adjust the overall level of the signal as you make changes. This is really handy when you need to A/B the plugin.
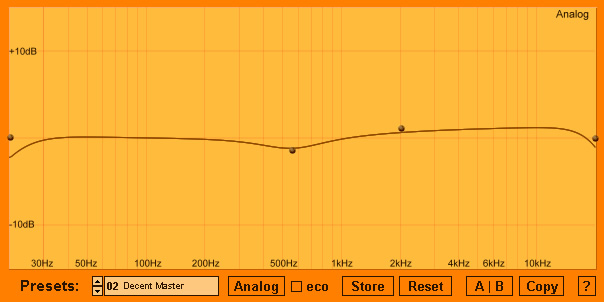
Electri-Q (posihfopit edition) by Aixcoustic Creations
Now, if you’re more in the market for control over your EQ, you might like what I have next. Electri-Q (posihfopit edition)is a powerful, low phase parametric EQ with the capability to handle up to 64 bands. It also comes with a variety of filter types and the ability to switch between clean digital EQ and transformer modeled analogue EQ that’s a touch more colourful.
Whilst most DAWS typically offer their own parametric EQ, this offers you a little bit more. With it’s added controls, expanded band allowance, and low phase calculations, it becomes a powerful tool for mixing and mastering. It’s not the prettiest of things to look at but then who really cares?
The Best Free Compressor VSTs
Compression is always a tricky one for beginners. Just like with EQ, most DAWs only come with one standard compressor that often has a one glove fits all approach. For anyone who understands compression, you’ll know that no single compressor is perfect for everything. Below are a couple of really great tools that I guarantee will operate far better than any built-in DAW compressor.
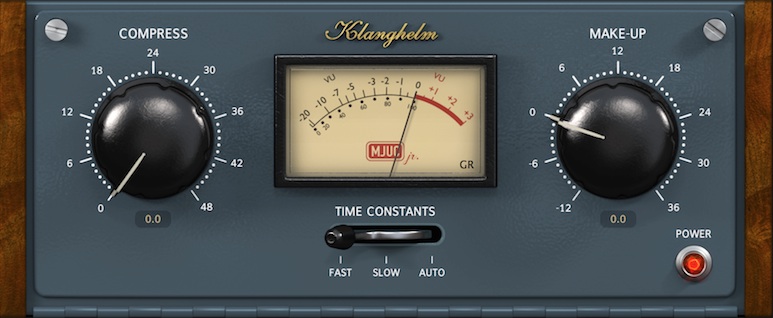
MJUC JR by Klanghelm
In a previous article, I addressed the different circuit types that you can typically find in compressors. One of the lesser knowns of these is the Vari-Mu. Often used in mastering, Vari-Mu (or variable-gain) is a tube based compression type. The original design is owned and trademarked by Manley and costs so much, you’d need to remortgage your studio. However, there are plenty of software alternatives out there. Obviously, these don’t use tubes so you’re not going to get that true vari-mu sound. However, the concept for the compression type holds true and there are even free versions on the market.
The MJUC JR by Klanghelm is a great example of this. It has a simple and straightforward design just like a vari-mu should. We get one knob for the amount of compression and another for makeup gain. We also have a control for the recovery time and slew rate giving us control over different content types. Stacked up against the Waves Puigchild this thing performs pretty well. It works great as a glue compressor, however, I find it a little over aggressive for the circuit type.
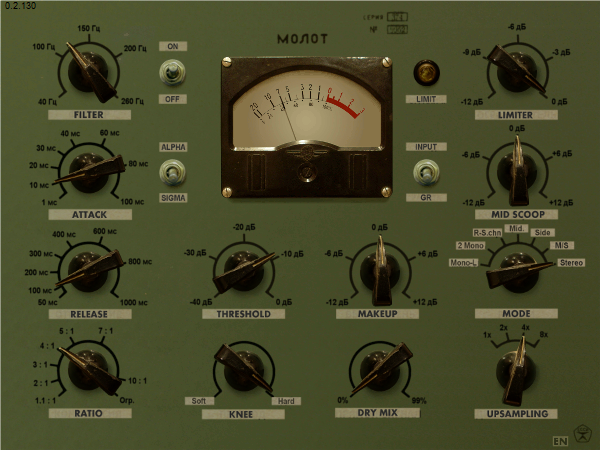
Molot by vladg/sound
Another great compression plugin to have to hand is Molot. On the surface, this looks like a fairly typical optical compressor. However, once you chuck onto a channel it really comes into its own. This thing is far from transparent and offers a staggering amount of power. You’ve got the addition of a high-pass filter as well a limiter, mid scoop bell EQ, and multiple stereo image modes. For me, this is reminiscent of the Fairchild in its design but more like an 1176 in its sound. It’s something you’ll probably have to learn to use and then only implement when you know you need it. But when you need it, it’ll work wonders!
Having a variety of compressors in your arsenal is imperative. Knowing how and when to use them is even more important still. Many DAWs come with one stock ‘one glove fits all’ compressor which is really no help. Grab these great free VST plugins to make sure you’ve got choices in your tool belt.
Moving on to Mastering Tools
Besides the typical things such as EQ and compression, mastering tends to deal with the subject of width and loudness. Here a few freebies that can help get your tracks into that commercial realm without costing you a penny.
YouLean Loudness Meter
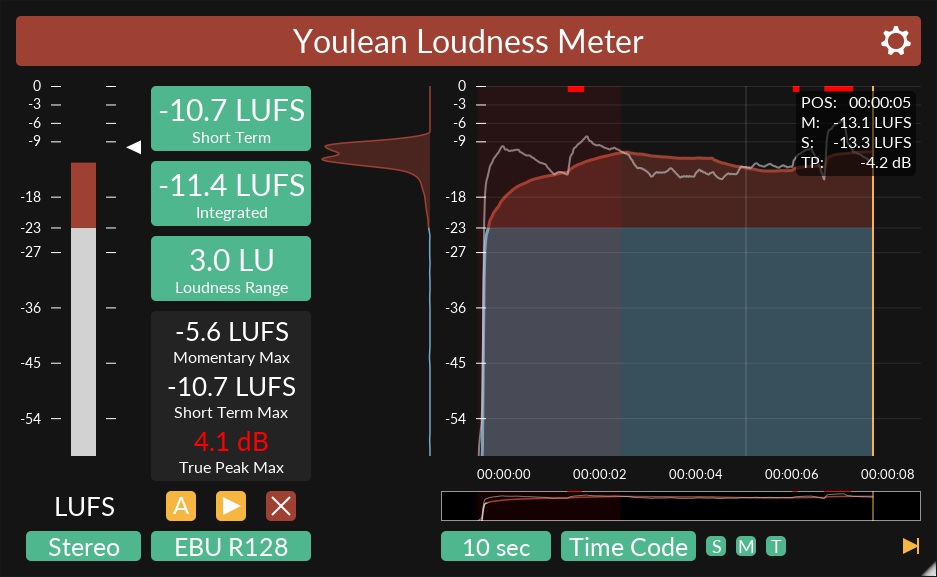
Being able to measure loudness and dynamic range accurately is one of the most important things a mastering engineer has to do. You can easily pay hundreds on histogram tools with fully customizable features. Or, you can grab the Youlean Loudness Meterfor absolutely nothing.
A truly marvellous tool that does everything that you need a LUFS loudness meter to do. Easy to understand short-term and integrated loudness metering with a dynamic range readout and a true peak detector. It also provides measurements in mono and stereo and has a detailed and adjustable histogram. Seriously, you couldn’t ask for much more out of something like this, especially when it’s completely free.
If you don’t already have some form of loudness metering software, this is a great place to start. I routinely chuck this on my master channel even when I’m doing production or mixing work. It’s a really easy way to make sure you’re not clipping and a fabulous tool for identifying dynamic contrast in your work. Equally, it’s very handy when it comes to examining reference tracks. If you’re one for commercial loudness and being competitive in the market, this plugin is going to set your mind at ease in a heartbeat.
TT Dynamic Range Meter
Another great little tool to grab is the TT Dynamic Range Meter. Far simpler than the loudness meter above but it does a great job at measuring dynamic range and peak levels. For a low CPU quick mix checker, it’s definitely worth having. Especially before sending your material off for mastering.
Ozone Imager by Izotope
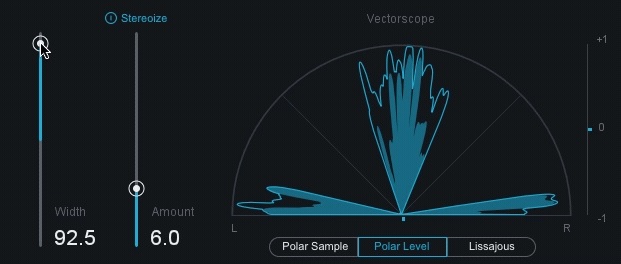
Another notable mention for freebies is the Ozone Imager. A slightly simpler version of the one that comes with the paid suite, this little gem is a great mastering tool for stereo width. It’s not something that I’m a huge advocate of because of the phase issues that these things can cause. However, used subtly for a little bit of separation, it can yield great results. It has a beautiful, simple design with a fader for width and another for the amount of stereoization. The vectorscope is a lovely thing to watch and really easily helps to show you exactly what’s going on under the hood. Grab this while it’s going free and get to work on widening your mixes. Just remember to check the mono mix afterward!
A Great Set of Free VST Plugins for Beginners
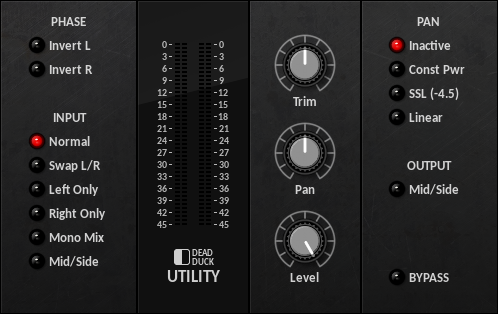
Now this tenth plugin is a little more than just a single tool. As I mentioned early on, many DAWs come with plenty of built-in tools. However, sometimes they are a little lacking or you’re simply missing a few of the essentials. If this sounds like the problem you’re having, I suggest you check out Dead Duck Software.
With a plain but appealing GUI, Dead Duck provides 24 free VST plugins for all your production and mixing needs. From a full channel strip to a ring modulator, this plugin bundle encompasses a really great set of tools. You’ve probably got alternatives for a lot of them already but where you don’t, they make a really strong addition. The simple design makes them great for beginners and they won’t let you down in what they can do.
Even if you’re thinking that you’ve got all the basic tools already, there is one real stand out here. The Utility plugin. This is something that lives on my master bus by default nowadays. Being able to quickly flick between your stereo, mono, and mid/side mix is super helpful. Also, it’s great for checking out the separate sides of your mix independently as well as their phase. Do yourself a favour and have a play around with some of these. I’m certain you’ll find something worth keeping in your toolbox.
A Few Additional Mentions in the Free VST World
Amongst the typical tools listed above, there are also a variety of specialist tools that can come in handy in certain situations. The ones I’ve sourced below for you are particularly useful because they aren’t commonly available in the typical DAW.
Vinyl by Izotope
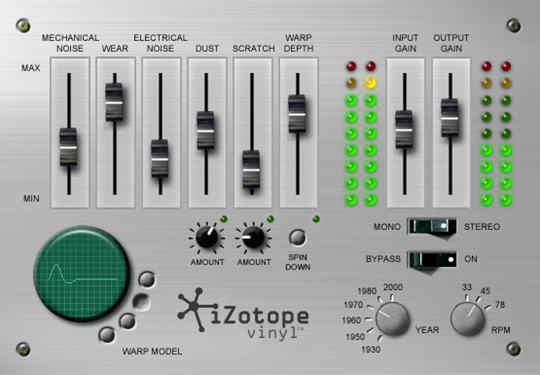
The first of these is a plugin by the name of Vinyl. Known as “The Ultimate Lo-fi Weapon”, Vinyl is a multi-parameter plugin designed to simulate the grit and noise of old analogue formats. This is one of those plugins that you can strap onto your master channel and use to dial in a bit of noise and ambience. It’s designed to give your tracks a little bit of character and edge. Now, this won’t be for everyone. I know plenty of people love a clean, modern sound and are thankful that gear has moved on from the noisy old bits of kit we had to use before. However, if you’re all about a bit of retro and lo-fidelity, then you are going to love this free plugin.
You’ve got controls for mechanical noise, electrical noise, dust, scratch, and warp. Not only this but you can dial in the amounts of each that you want as well as adjusting the whole plugin to replicate a different part of history. From the 1930’s to the 2000’s, Vinyl is capable of emulating an incredibly authentic sound for any genre at its high point. This is going to be especially great for those of you looking to get a really gritty 90s sound.
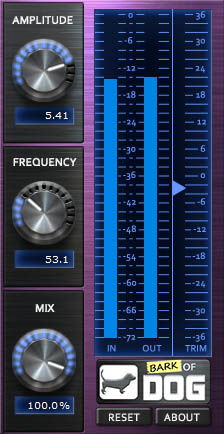
Bark of Dog by Boz Digital Labs
One of the most common things I find I have to do when mixing and mastering my client’s works is dealing with the low end. I’m often met with comments like “the tracking went well but we couldn’t get much low end from the kick“. Learning to position microphones and get the sound you want is a skill in itself. As much as it’s good to get it right at the time, some things can be improved in the mixing stage. Enter bass enhancement plugins.
As a big fan of Waves, I’ve always opted for using things like Renaissance bass for my low-end reinforcement. However, I was recently let on to a free VST plugin by the name of Bark of Dogthat does the exact same thing that my Waves plugin can do. Naturally, I was curious to see whether a free plugin could keep up with the likes of Waves.
Whilst the GUI isn’t as pleasing to the eye, the plugins actually have an almost identical setup. Frequency selection, input gain, and output gain. Where the Bark of Dog plugin has an edge is that it also allows you to control the wet/dry mix of the plugin. I see this as fairly redundant as I typically just dial in the amount of gain that I want. If I need less, I’ll dial less in as opposed to varying the wet/dry. However, it’s still an extra tool that Waves doesn’t provide.
In use, these plugins perform at an exceptionally parallel level. There are very minute tonal differences between the two but I found that the Waves plugin was slightly better at dealing with sonically dense tracks. However, for a free plugin, Bark of Dog is 100% worth downloading if you’re working on a budget. Try it out on full mixes and on individual channels and I think you’ll be pleasantly surprised at what it can do.
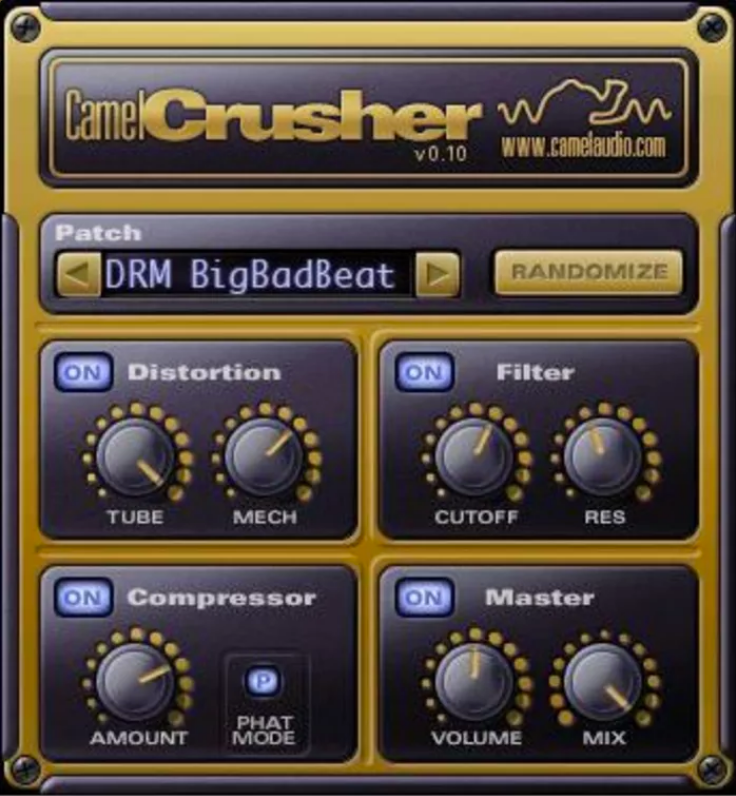
CamelCrusher by Camelaudio
For those of us mixing in the box, distortion and saturation plugins have always been a tricky one. If you’re lucky enough to have some decent outboard then you’re probably alright. Unfortunately, those of us working in the digital realm haven’t got as many options. This is even truer when it comes to free VST plugins. However, there is one that’s always served me well in a pinch. CamelCrusher not only offers fantastic distortion tones but it comes with a handy filter and compressor section to help you sculpt the results.
Offering tube distortion as well as mechanical distortion, CamelCrusher gives you multiple tone options for no money. The low pass filter isn’t anything special. It’s another great way to control your distortion without the need for further plugins. Again, the compressor is pretty simple and applies some soft-limiting to smooth out dynamic range. The phat mode button essentially applies smoother results. I find that it seems to almost always work better when turned on. I wouldn’t use this compressor as a first choice but it’s a handy little tool for smoothing out the effects of the distortion if it’s a bit too aggressive.
#chillwave sounds for Repro-5 64 sounds complete with unstable, jittery tones saturated with tape goodness. Inspired by dusky 70’s vinyl and mesmerising vintage Tokyo city nights Rich deep sounds, hugely organic playability. Dim the lights, loop a 12bit beat and play the sounds of your next Chillwave masterpiece
For me if you’re looking for excellent sounds for Chillwave, synth wave lo-fi etc music production then these Chillwave sounds these are definitely up there.
Currently I cannot find any other Chillwave packs for Repro5, and as an owner of Repro5 as one of my few synths this is important to me.
Lustrum is another really good designer I like to use. Sounds tend to be a bit more delicate and softer sounding so equally as good as sound7 but for a different target I guess.
So how does one actually get into music production? Where do you start with music production? What software do you need for music production? What does music production actually even mean?
All good questions we aim to give answers for to help those starting out.
Music production is the aim of creating, that is “producing” music. Simply creating music, somehow by some means. By banging pots and pans in rhythm in your kitchen and recording that to a tape, digital recorder or digital software it could be said you are now a ‘music producer’. It has nothing to do with being a published artists, having releases on Spotify or big labels.
So how would one start in this game?
Historically it would be difficult, you’d probably need to be an actual musician of sorts, able to play some physical instrument or at least able to sing because studio time was expensive, relied on specialist engineers and rooms full of physical hardware that costs literally 10000’s even the simplest of dedicated gear to record takes and multiple tracks was expensive so the barrier of entry was high.
Now-a-days, like many industries, software has truly shaken up ones ability to get into Music Production as way as re-define what music production even means and what results can be had from your efforts.
So let’s crack on firstly with some terms of reference as it’ll make it easier going forwards.
DAW – Digital Audio Workstation. Essentially a piece of software to allow you to record external instruments into to being able produce something from scratch completely internally aka ‘in the box’
Synthesizer – a device whether hardware (physical) or software (digital and on screen) that basically generates sound from a set of user changeable controls
Sampling – Recording generally small chunks of sounds from potentially any source for later (usually) manipulation and playback as a musical element.
Audio interface – A hardware device that’s main aim is to get the digital code and sounds generated within your software out to the external world to your listening device, usually speakers and headphones. An audio interface also usually enables the ability to record external audio sources into your Digital Audio Workstation
So what do we need to actually get started?
Cakewalk by Bandlab- Formally known as Sonar
The quickest and easiest point of entry assuming you already have means of sound coming out of your PC, Mac or mobile device is to either download or purchase a DAW.
You will find some free ones with limited but completely functional feature sets whilst the more commercial ones come with greater feature set and content.
If you’re just starting out on a PC then Cakewalk by Bandlab is currently the most extensive you can get for “free”. But it may be overwhelming and bewildering if you’re approaching this as completely new to it all.
There are other inexpensive options and Trial versions of good DAWS that will certainly be enough to whet your appetite. I’d personally recommend trying out the FLStudio trial.
It’s easy to approach and learn pattern based grid system is quite intuitive and not only give you instant results (which is important for staying engaged enough to want to learn more) but through recording a few patterns into it’s timeline based sequencer it’ll teach you some really early doors multi-track recording techniques that once you gain experience with these skills will translate really easily to most other popular daws and will serve you well for your future. FLstudio in itself is a completely competent and full fledged music production software workstation so you may well want to stick with that after trying it out and you could do far worse. It’s certainly been a staple for many a top producer such as Deadmau5 and even Mike Oldfield.
Once you’ve got some software sorted whether it be free, trialled or paid we’ll later look at the common terms you’ll hear related to it, actually how to use it to put elements together and what to do next..
Saturation is a difficult effect to master, as it relies on many different varibles, some tangible and some a lot more nuanced. And one persons version of saturation may be wildly different to another persons saturation so emulating this in vst plugin form is quite a feat. Naturally any extended efforts into creating a decent saturation plugin most developers look to commercialise for a return on their time investment of because they feel they’ve created the golden egg of saturation. So finding good free ones is quite a feat.
We’ve done the leg work and rounded up what we believe to be the best free saturation plugins for you and your music productions here. Whether you’re looking for grit, track level tone or overall mastering type shimmer there’ll be something here for you.
It looks and sounds great with an excellent richly warm cosy feeling to its tone. 2x oversampling ensures quality in tone remains high without unwanted digital artefacts.
It’s modelled on a tube based filter drive unit with an analogue designed ladder filter with 4 pole lowpass and 2 pole high pass with a passively controlled feedback circuit. Great for warming up bass, vocals, guitar and synth lines in you productions.
From a one person outfit call Signaldust, don’t be put off by the old school graphical ui and almost pixel art style text labels, because this one sounds fantastic. The developers focus is on “high-quality processing with original ideas, manually fine-tuned algorithms doses of non-linearities and noise where they enhance the subjective perception of sound.”
Features include input level boost, followed by a saturation module (previously known as the “warm” mode) with drive (0dB setting matches the old saturation) and a simple bass boost to compensate for the potential loss of low frequencies.
Followed by the saturation is the famous clipper itself, with a peak limit control and an optional makeup switch (which boosts the limit back to 0dB after clipping).
And blinking lights to show you how you’re clipping far more than you should.
Analog sounding, simple to use, yet versatile way of adding some sweet distortion to your tracks. The knob itself controls the amount of saturation, and there are three different distortion characteristics to choose from by flicking the switch.
With the switch set to Neutral, the entire frequency spectrum of the sound gets distorted when you turn up the Saturation knob. Put it on Keep Low, and the saturation will mainly affect the lower part of the frequency spectrum, while the top end stays clear. Conversely, with Keep High selected, the low end will retain its clear sound and instead only the treble parts of the sound will get distorted.
From well respected developer Klanghelm delivers everything from soft and subtle saturation to very dense and dirty distortion effects to spice up single tracks.
Everything in IVGI reacts dynamically to the input signal. Even down to the modelled fluctuations which also change depending on the drive setting. Along with integrated crosstalk, controlled ‘randomness’ which controls internal drive of parameters means it has a liveliness and realness to it’s character which you won’t find on many commercial saturation plugins, let a lone free ones.
The W2395C is actually a Baxandall EQ with a powerful and beautifully sounding mid band and drive control. As solitary or complementing equalizer with that special something, its particular tone and slightly interactive bands let your tracks stand out big time.
Ramp up the drive control for some really nice saturation effects and coupled with the Bax EQ it works really well. Looks great too.
Whilst it’ll work on individual tracks the combined drive and bax curve EQ means it really excels at master bus duties.
A pure and simple saturation plugin. Although very simple to use, it utilises many underlying technologies to create the right type of tone. It has 6 distinct saturation settings. Each of these settings utilizes a distinctly-tuned multiband saturation algorithm. And uses 4x oversampling to reduce the aliasing effects of saturation.
Whilst it will distortion; it really excels at gentle saturation effects. With the four saturation settings having an emphasis on different frequency components such as giving your tracks low-end saturation without dulling the high frequencies, or giving a shimmering high-end sparkle without muddying the bass. Perfect for you music productions.
As a music producer particularly when starting out it’s tough, moneys tight, skills still developing and wondering how everyone else is seemingly achieving “that sound” with ease.
Well as part of our on-going series we’ll be looking at the best free tools we can find to help you on your music production journey.
Today we’re looking at delays. Great for all genres of music from Rock to EDM they should have a place in every music producers tool kit.
tape model including tape saturation, wow, flutter, low and high pass filtering
separate control of delay time for left and right channel
The delay time is not entered in milliseconds but as a notelength (in relation to the song tempo in your sequencer). The Groove parameter allows fine tuning from tripplet to dotted note timing.
“Drift” parameter gives you the possibility to create delays wandering to the left or to right in the stereo field
press the “Ping Pong” button to create delays alternating between left and right speaker.
parameter “Smooth” creates continuous delay time changes like on a real tape delay (no digital clicks when changing delay time during the song)
parameter “Stereo Width” varies stereo effect from subtle to drastic
MIDI learn: Right-click any control to assign a midi control and automate the parameter from you DAW.
pop-up hints help to understand the function of each control on the user interface. These appear when the mouse rests over a control.
A 4x oversampled distortion stage allows to add vintage distortion to the delayd signal, but its also possible to make clean delays.
A sinus LFO has the possibility to modulate delay time and low pass filter cutoff. Adjustable LFO stereo width is also included.
Analog sounding 6dB low pass filter with resonance and a 3dB high cut filter are also parts of TAL-DUB-II. Different routing options open a wide range of possibilities.
Speculumfree is a delay/comb filter effect plugin.
Speculum’s state can be switched between delay and comb filter. The resulting sound is fed through a resonant low pass filter.
The delay rate can be finely adjusted through the divide function. This gives speculum the ability to produce flanging, chorus and phasing effects when automated.
I’ve somehow managed to accrue over 20 years in all things music production, quite unexpectedly so it’s about time I offered something back to everyone where you’re where I was 20 years ago or you’ve been in the game for longer than me I hope you’ll be able to take something away.
My expertise is around the following
Initial production
Synthesis and sound design
Sampling
Mixing
Mastering
Dynamics
Things I’m not so strong at
Composition
Melody creation
So this is as much about me learning from you as you learning from me.